
API Self Service
This guide walks you through setting up PKI-based API authentication in the BCB Client Portal. You will:
- Create a service account that represents your integration.
- Issue one or more API signing keys for that service account from your own certificate signing request (CSR).
- Manage the lifecycle of those keys: rename, revoke, filter and report.
All configuration lives under Developers → API management in the left-hand navigation.
Key concepts
- Service account: a non-human identity linked to exactly one counterparty. It defines where requests may come from (IP allowlist), what they may do (entity permissions), and who is notified of changes.
- Signing key: a credential issued to a service account from your CSR. Each key has a Key ID (KID), an algorithm, and an expiry date. Your integration signs API requests with the private key that matches the CSR.
Before you begin
Make sure you have:
- Access to the BCB Client Portal with permission to manage API access for your counterparty.
- A mobile phone registered to your user. Creating a service account is confirmed with an SMS code.
- The public IPv4 addresses or CIDR ranges your integration will call the API from.
- A PEM-encoded PKCS#10 CSR generated from a private key that you control (see Generate a CSR).
The API management page
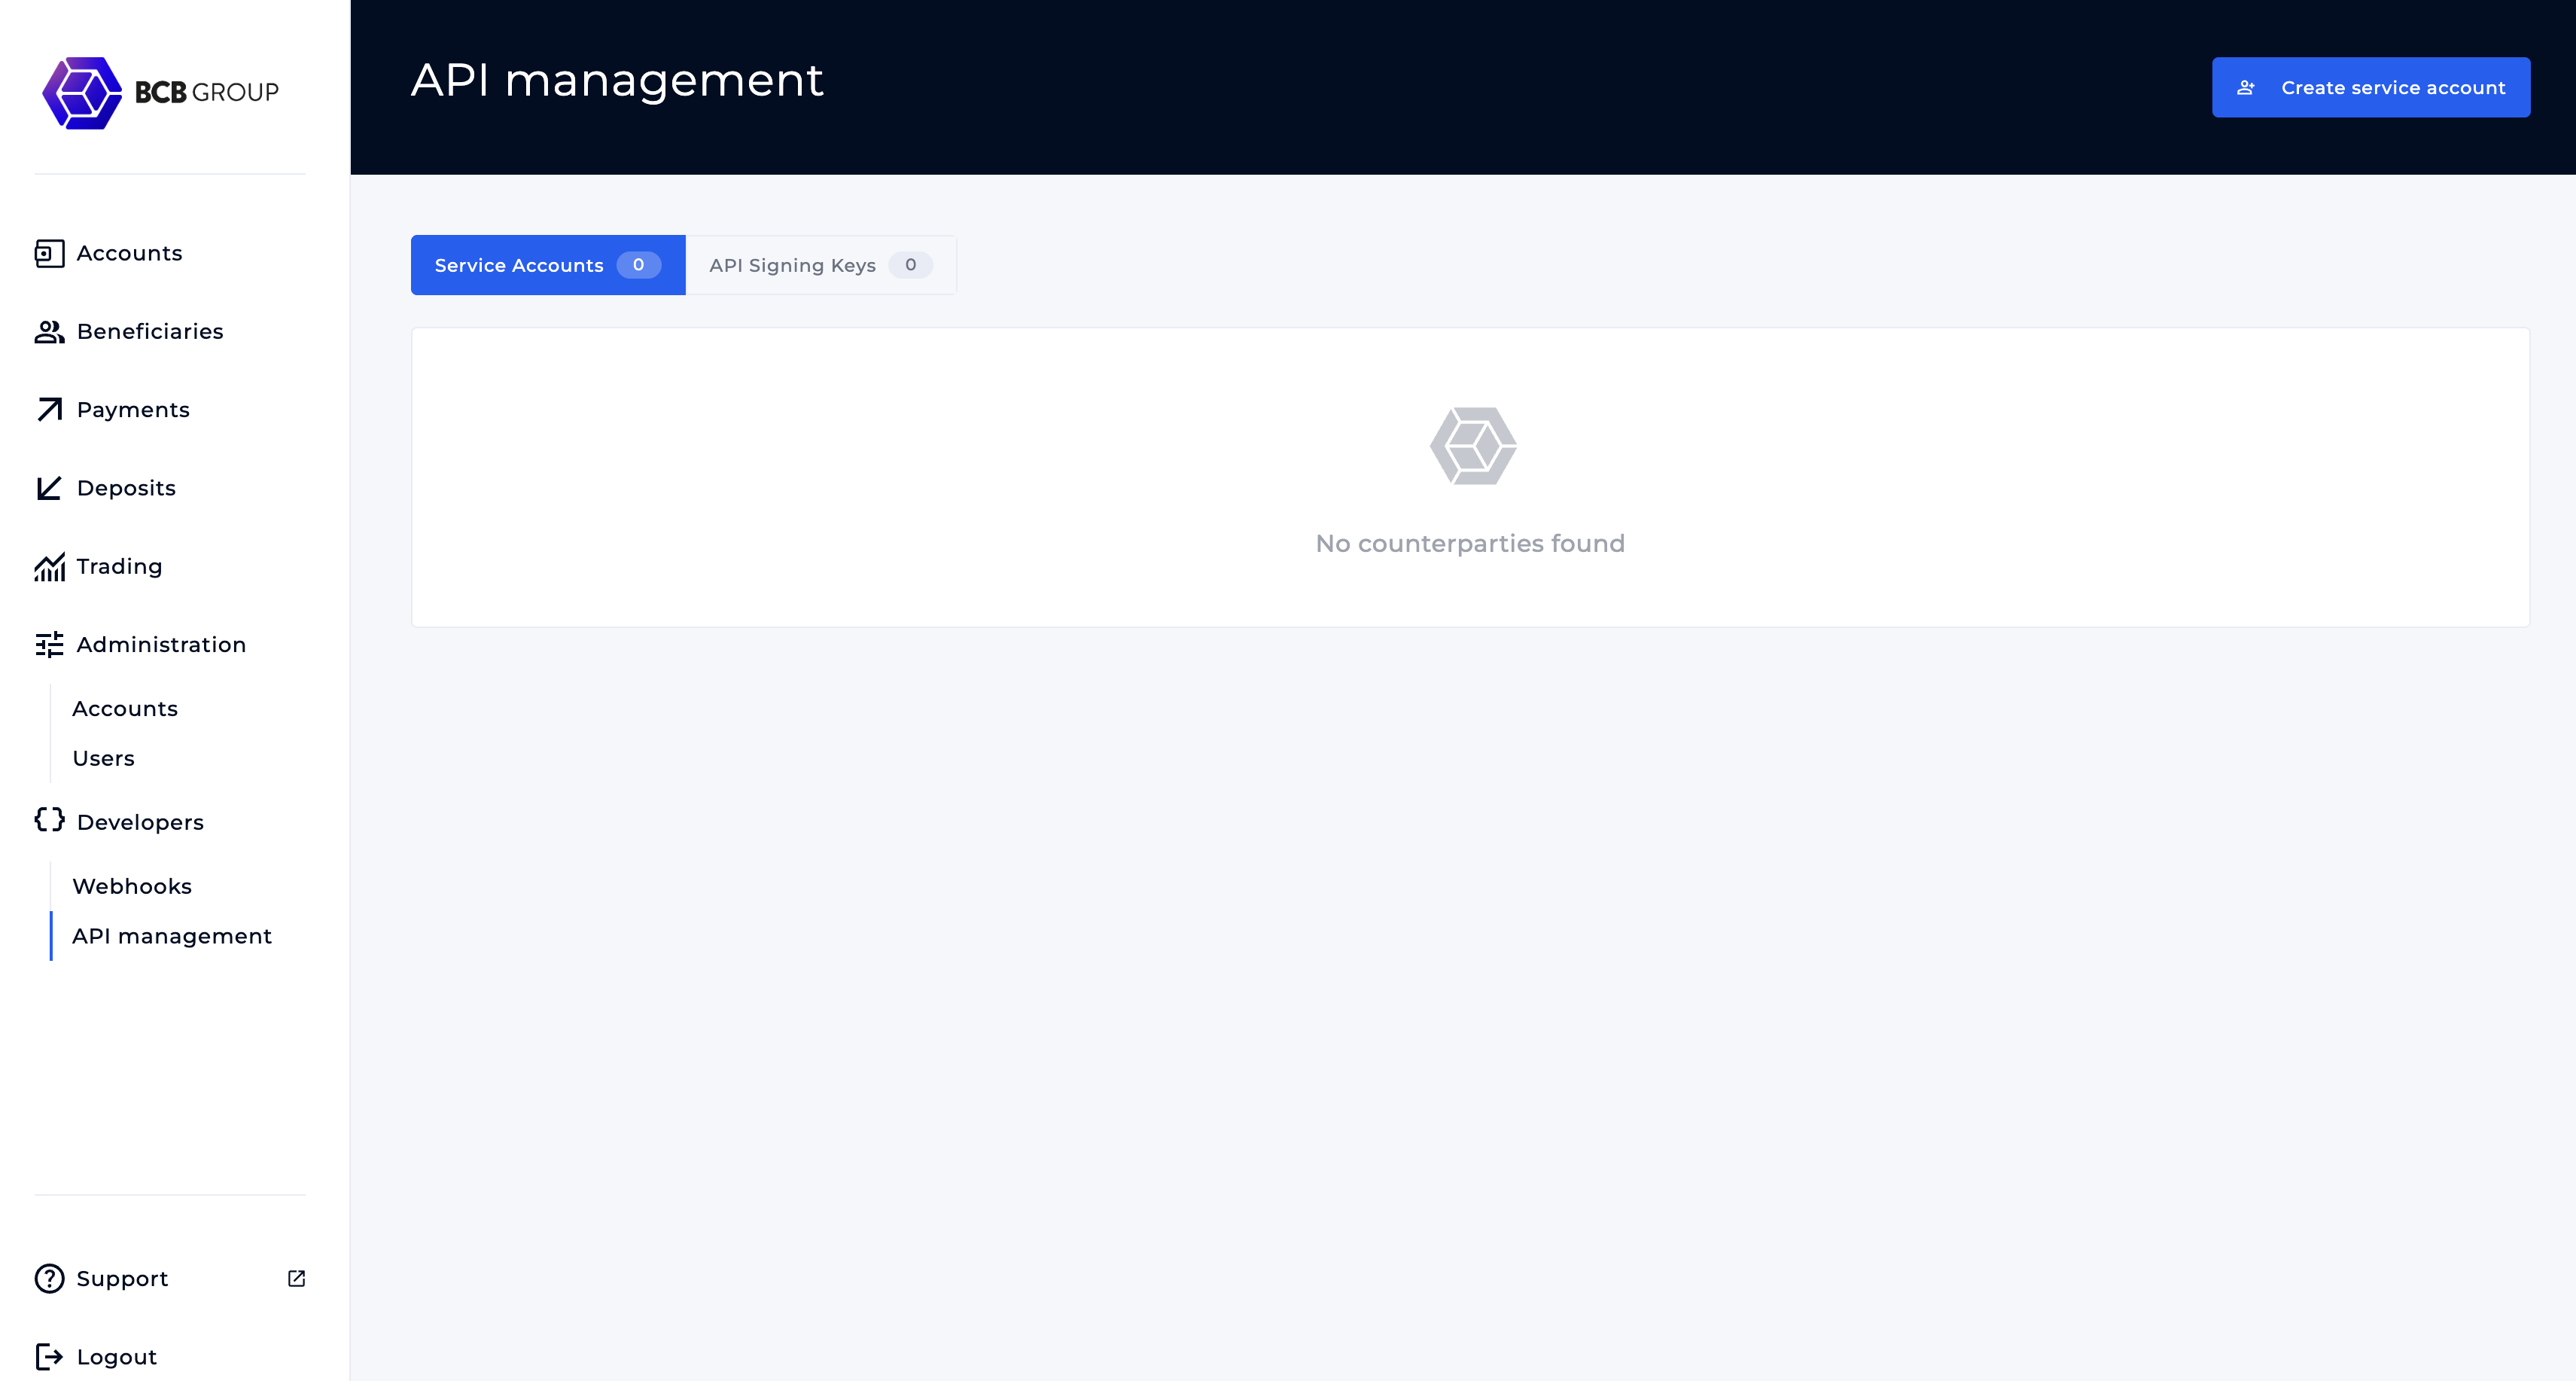
Go to Developers → API management. The page has two tabs:
| Tab | What it shows |
|---|---|
| Service Accounts | Your service accounts, grouped by counterparty, with a count of active and revoked keys for each. |
| API Signing Keys | Every signing key across all service accounts, with a status summary, filters and a report download. |
Use the search box to find a service account by counterparty or service account name. Click the arrow next to a counterparty to expand its service accounts.
Create a service account
- On the Service Accounts tab, click Create service account (top right).
- Complete the form:
| Field | Required | Notes |
|---|---|---|
| Service account name | Yes | A recognisable name, e.g. Payments integration – production. |
| Description | No | Free text to help your team identify the account. |
| IP allowlist | Yes | Enter an IPv4 address (e.g. 203.0.113.10) or CIDR range (e.g. 198.51.100.0/24) and press Enter to add it. Add as many as you need. Requests must come from at least one listed address. |
| Notification emails | Yes | Enter an address and press Enter to add it. These addresses are notified about service-account and signing-key changes. All Admin and API managers for the counterparty are notified automatically as well. |
| Counterparty | Yes | Select the counterparty the service account acts for. A service account can be linked to only one counterparty. |
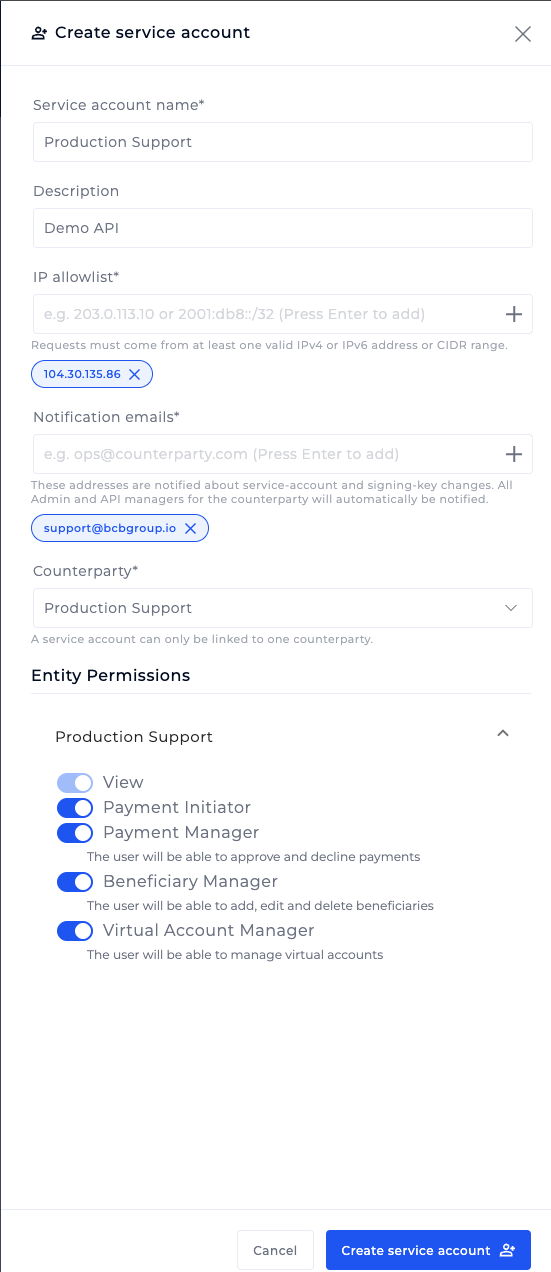
Press Enter to add each valueIP addresses and email addresses are only saved once they appear as a tag below the field. If you type an address and don't press Enter, you will see "At least one notification email is required" or a similar validation message.
- After you select a counterparty, the Entity Permissions section shows the permissions you can grant. Switch on the ones your integration needs:
| Permission | What it allows |
|---|---|
| View | Read-only access. Always on. |
| Payment Initiator | Create payments. |
| Payment Manager | Approve and decline payments. |
| Beneficiary Manager | Add, edit and delete beneficiaries. |
| Virtual Account Manager | Manage virtual accounts. |
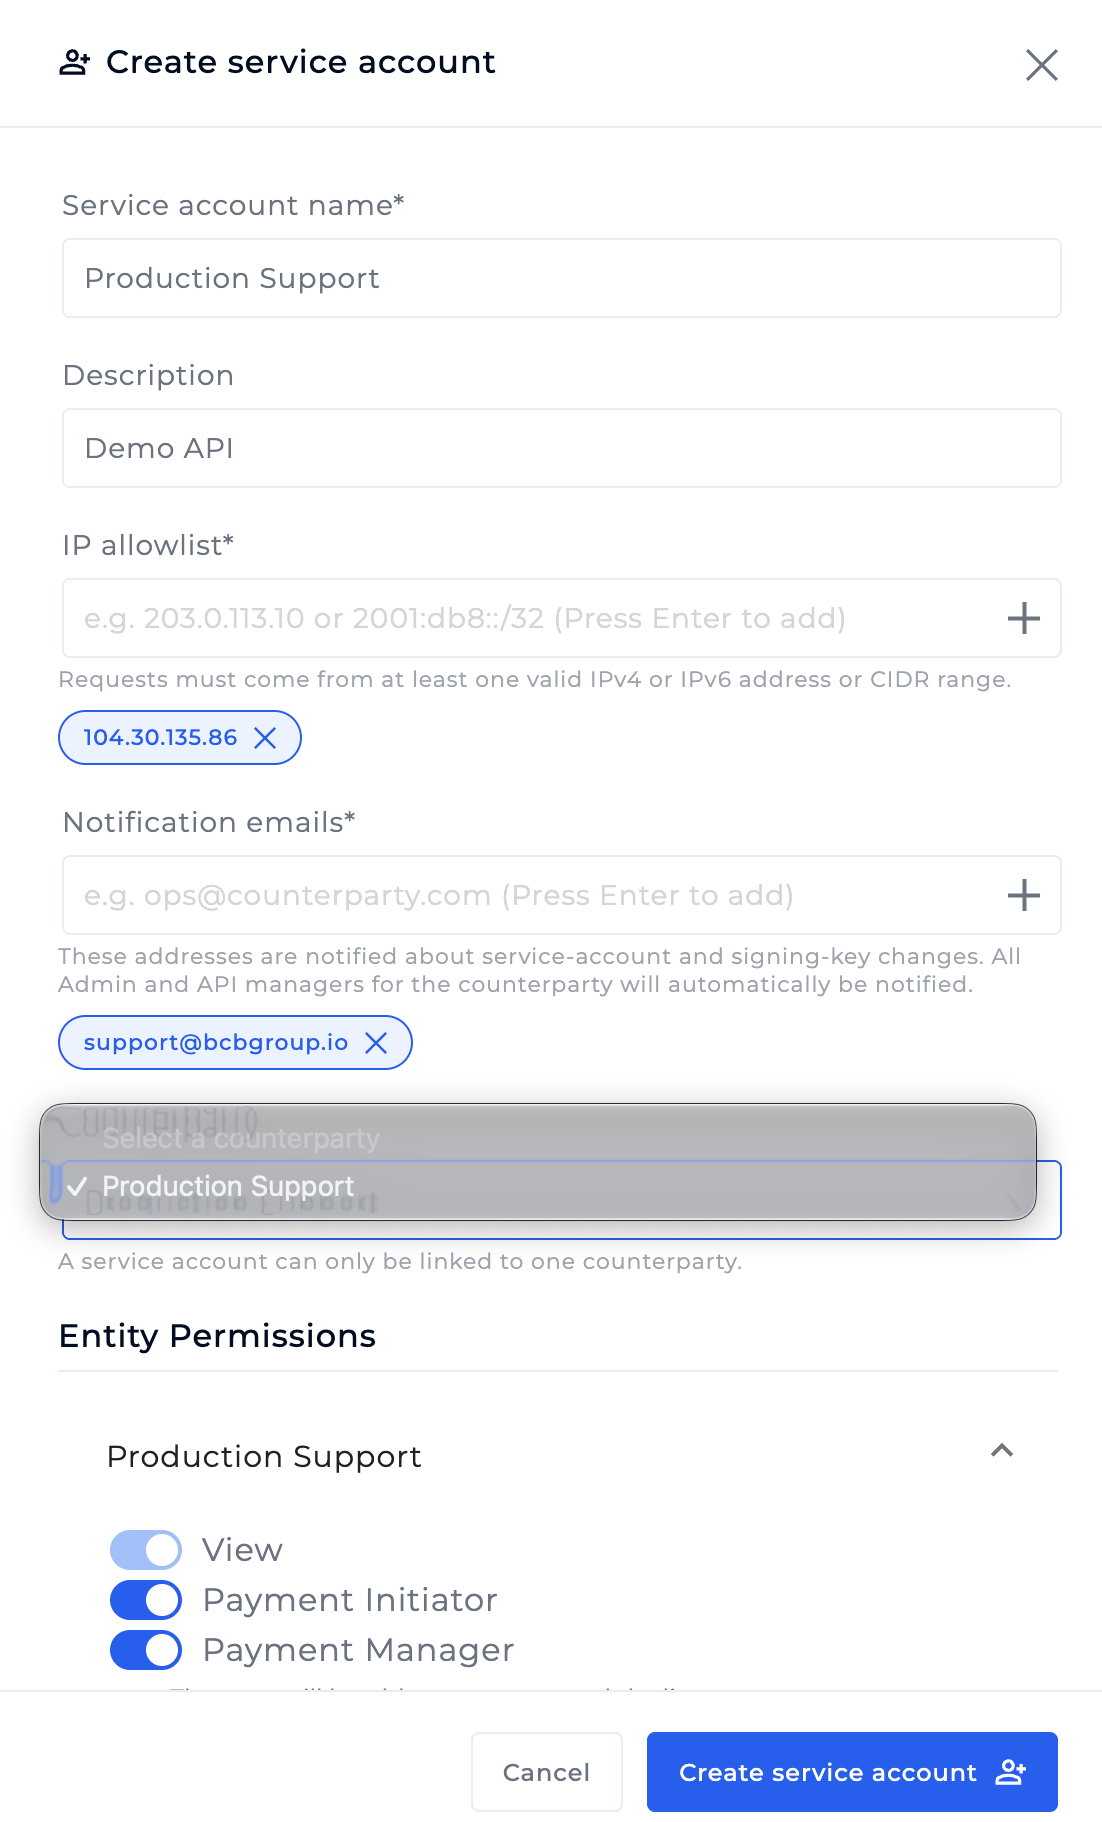
Least privilegeGrant only the permissions the integration actually uses. For example, a reporting integration only needs View.
- Click Create service account.
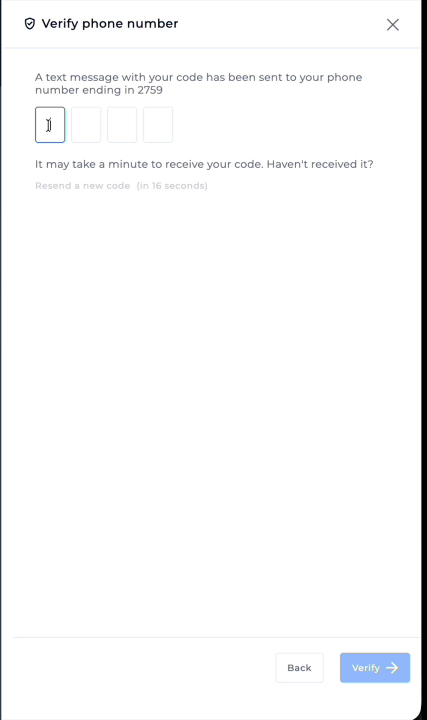
- Enter the verification code sent by SMS to your registered phone number, then click Verify. If the code doesn't arrive, wait for the timer and click Resend a new code.
-
-
When you see Service account created, click Done.
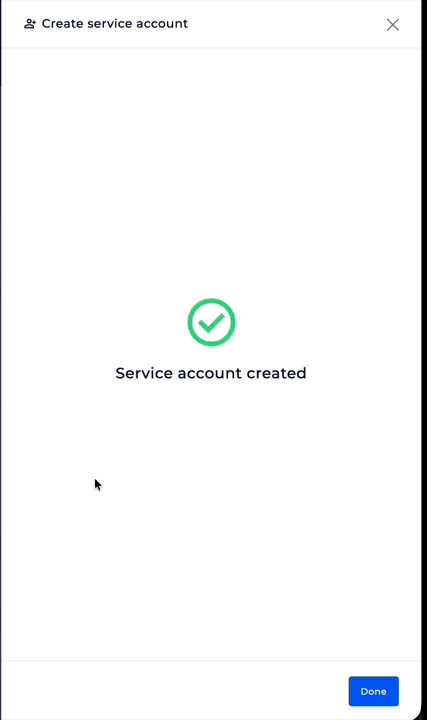
The new service account now appears under its counterparty on the Service Accounts tab.
View a service account
Click a service account name to open its details page. It shows:
- Name, description and creation date.
- Counterparty, Permissions, IP allowlist and Notification emails.
- A Signing keys table for this service account, with a status filter.
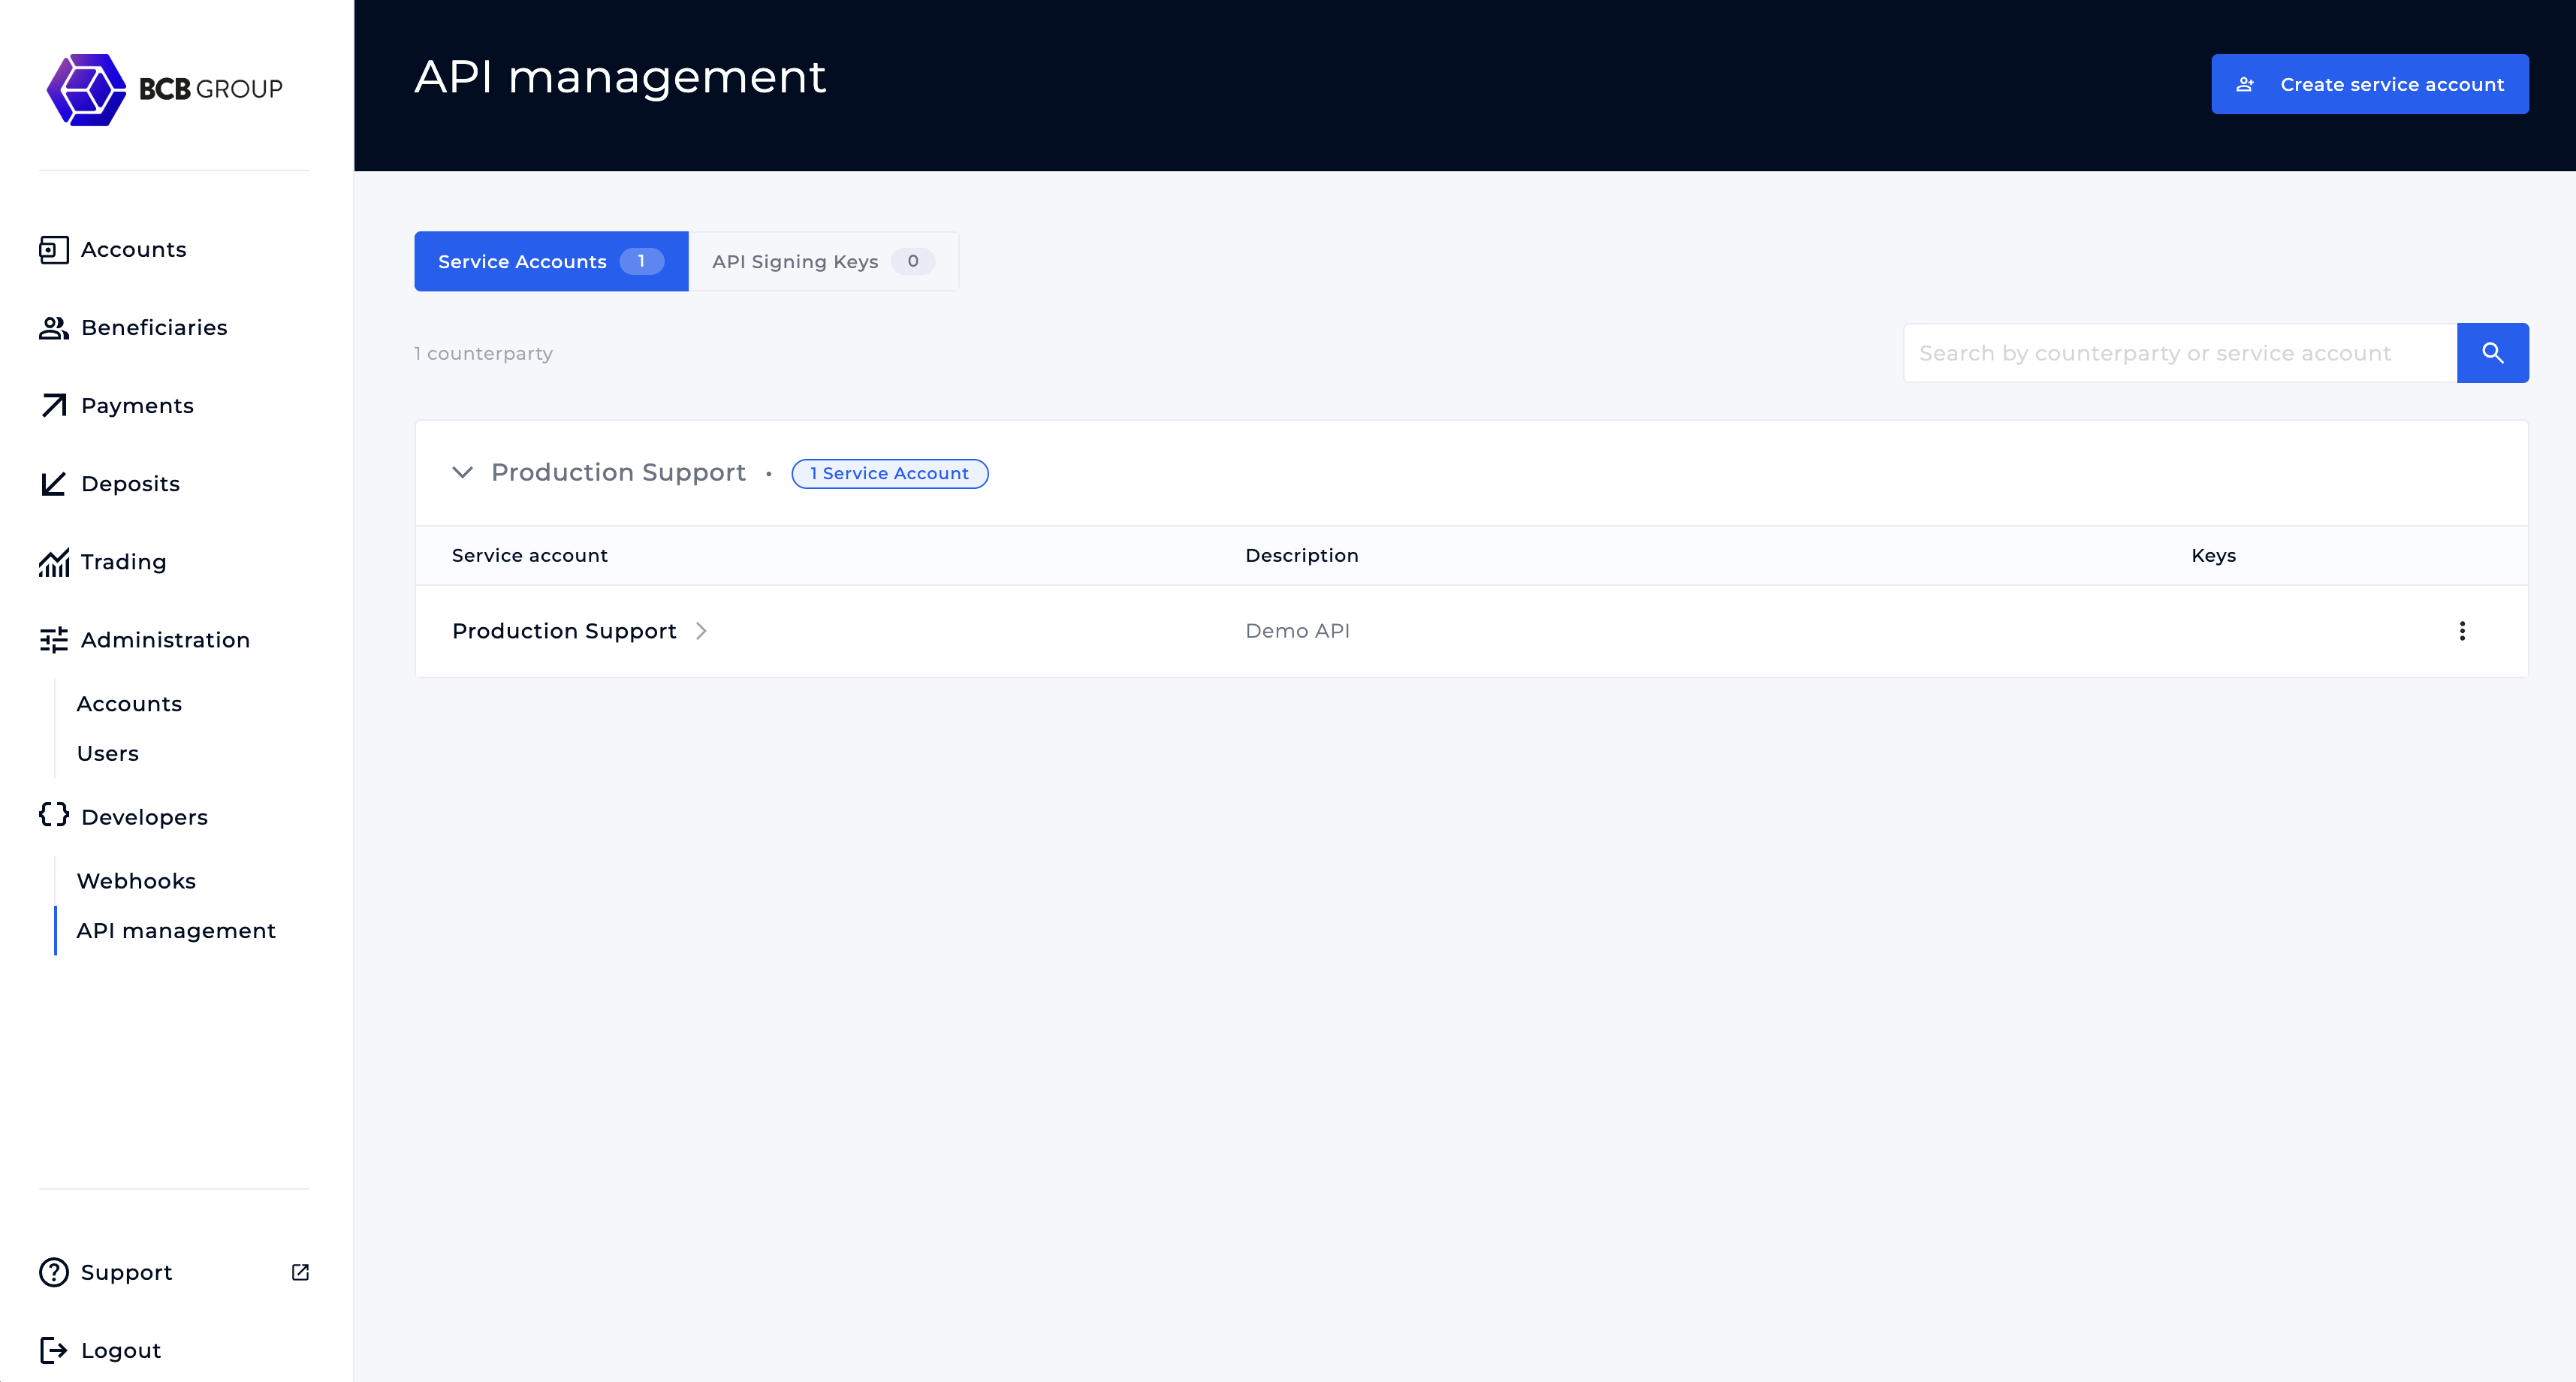
Click Service Accounts (breadcrumb, top left) to go back to the list.
Edit a service account
- Open the service account and click the ⋮ menu (top right of the details card), then Edit. You can also use the ⋮ menu on the service account's row in the list.
- Update the name, description, IP allowlist, notification emails or entity permissions.
- Click Update service account.
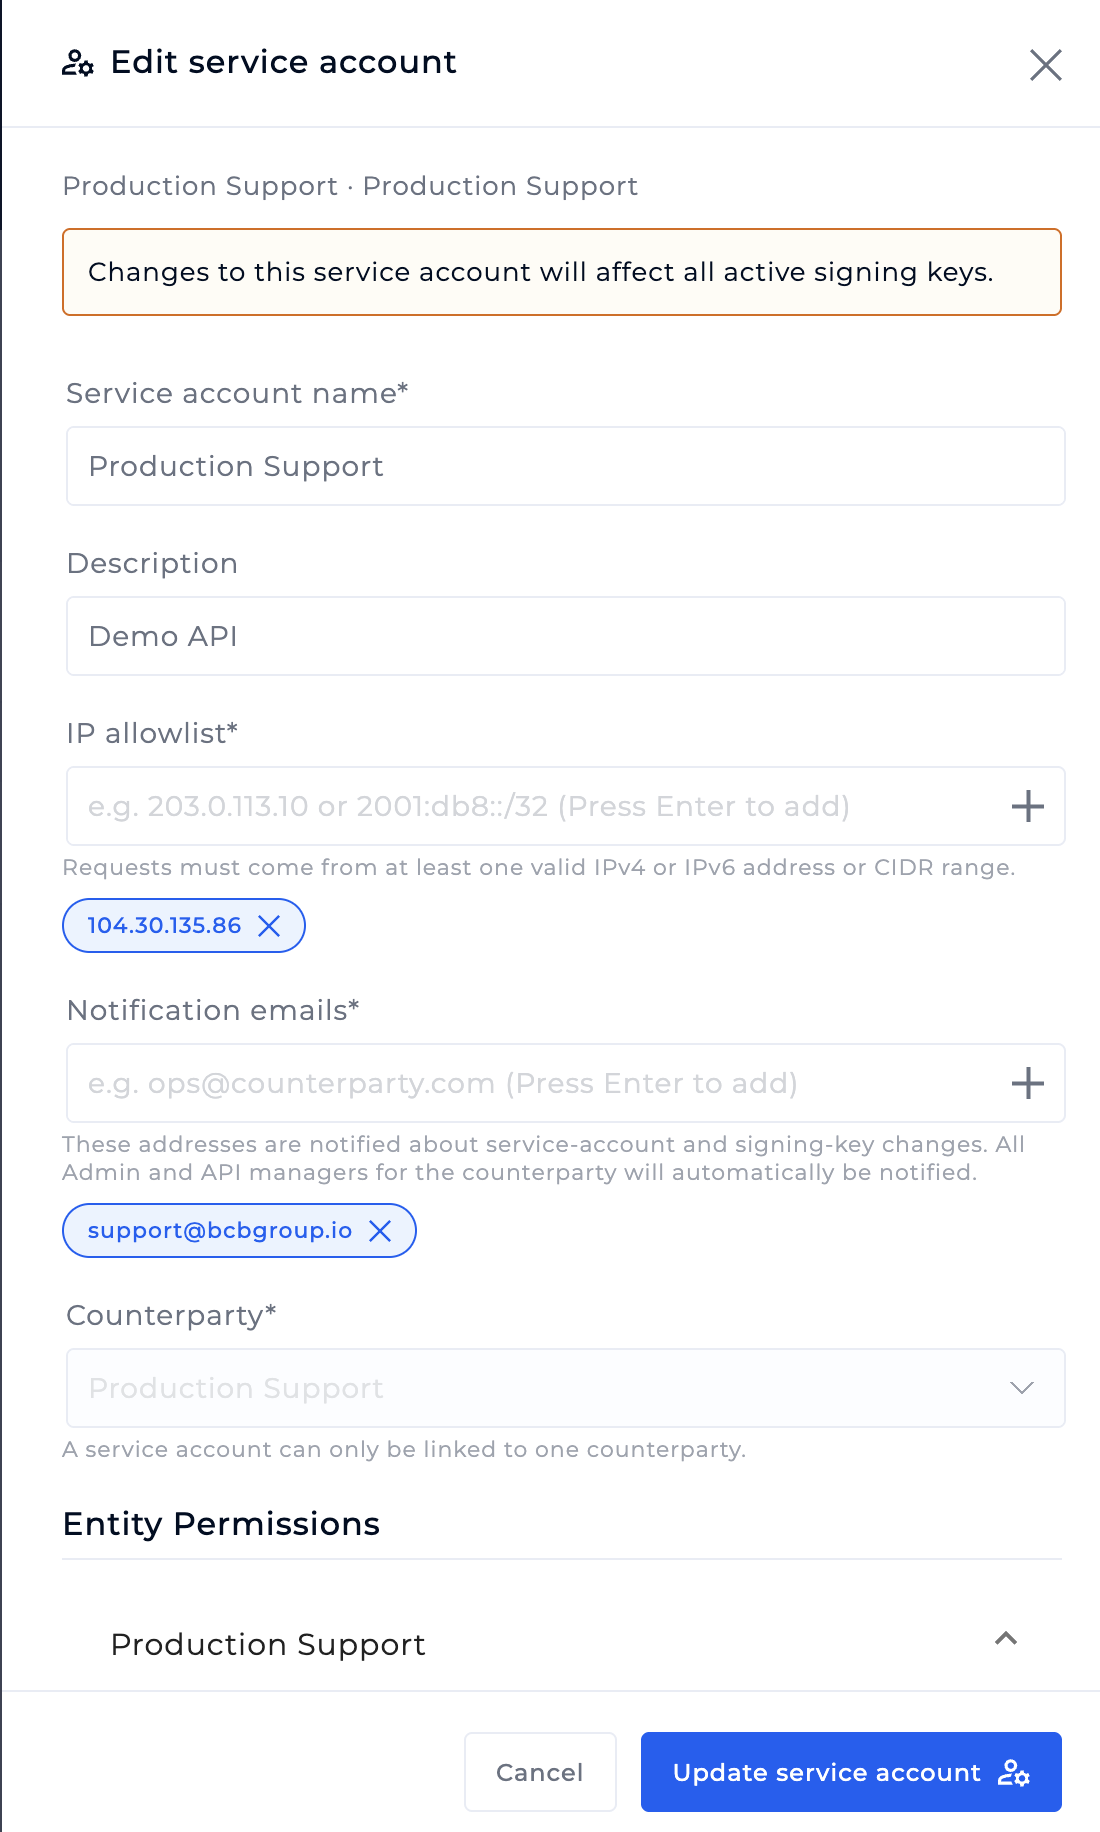
Changes apply to all active keysChanges to a service account affect all of its active signing keys immediately. For example, removing an IP address from the allowlist will cause requests from that address to fail, whichever key signed them.
The counterparty can't be changed after creation. To move an integration to a different counterparty, create a new service account.
Create a signing key
Generate a CSR
You generate the key pair yourself. BCB receives only the CSR, never your private key. For example, with OpenSSL:
# Generate a 2048-bit RSA private key and a PKCS#10 CSR (PEM encoded)
openssl req -new -newkey rsa:2048 -nodes \
  -keyout bcb-signing.key \
  -out bcb-signing.csr \
  -subj "/CN=my-service-account"
Keep bcb-signing.key secret and store it securely, for example in a secrets manager or HSM. Upload bcb-signing.csr in the portal.
The example is for illustration only. Follow your organisation's key-management policy for key size, storage and rotation. The algorithm you select in the portal (e.g. PS256, RSASSA-PSS with SHA-256) must match how your integration signs requests.
Issue the key in the portal
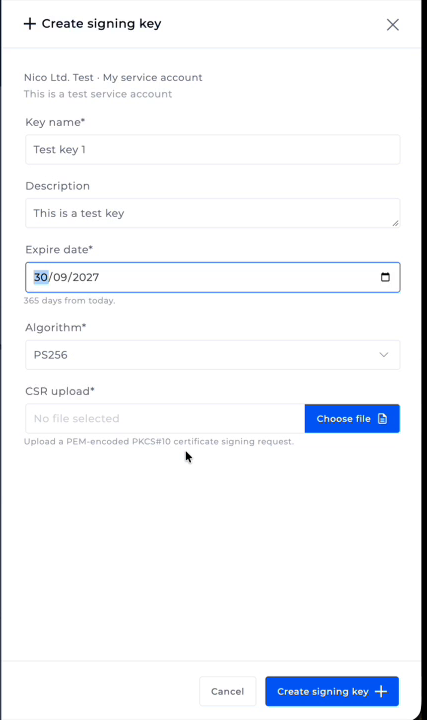
- Open the service account and click Create signing key (top right).
- Complete the form:
| Field | Required | Notes |
|---|---|---|
| Key name | Yes | E.g. prod-key-2026. |
| Description | No | Free text. |
| Expire date | Yes | Pick a date with the calendar. The number of days from today is shown under the field. |
| Algorithm | Yes | The signing algorithm, e.g. PS256. |
| CSR upload | Yes | Click Choose file and select your PEM-encoded PKCS#10 CSR. |
-
Click Create signing key.
-
The Key ID (KID) is shown once the key is created. Click the copy icon and store it securely, then click Done.
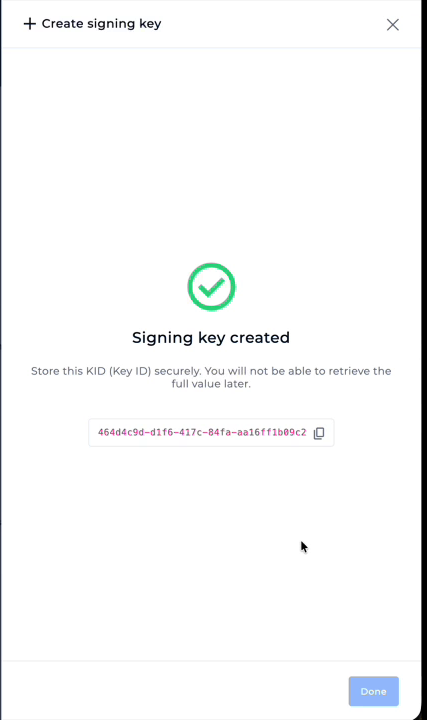
Copy the KID nowYou won't be able to see the full KID again. After this screen, the portal only shows the last 7 characters.
The key now appears in the service account's Signing keys table with the status Active, its short Key ID, the Valid until date and Last used time.
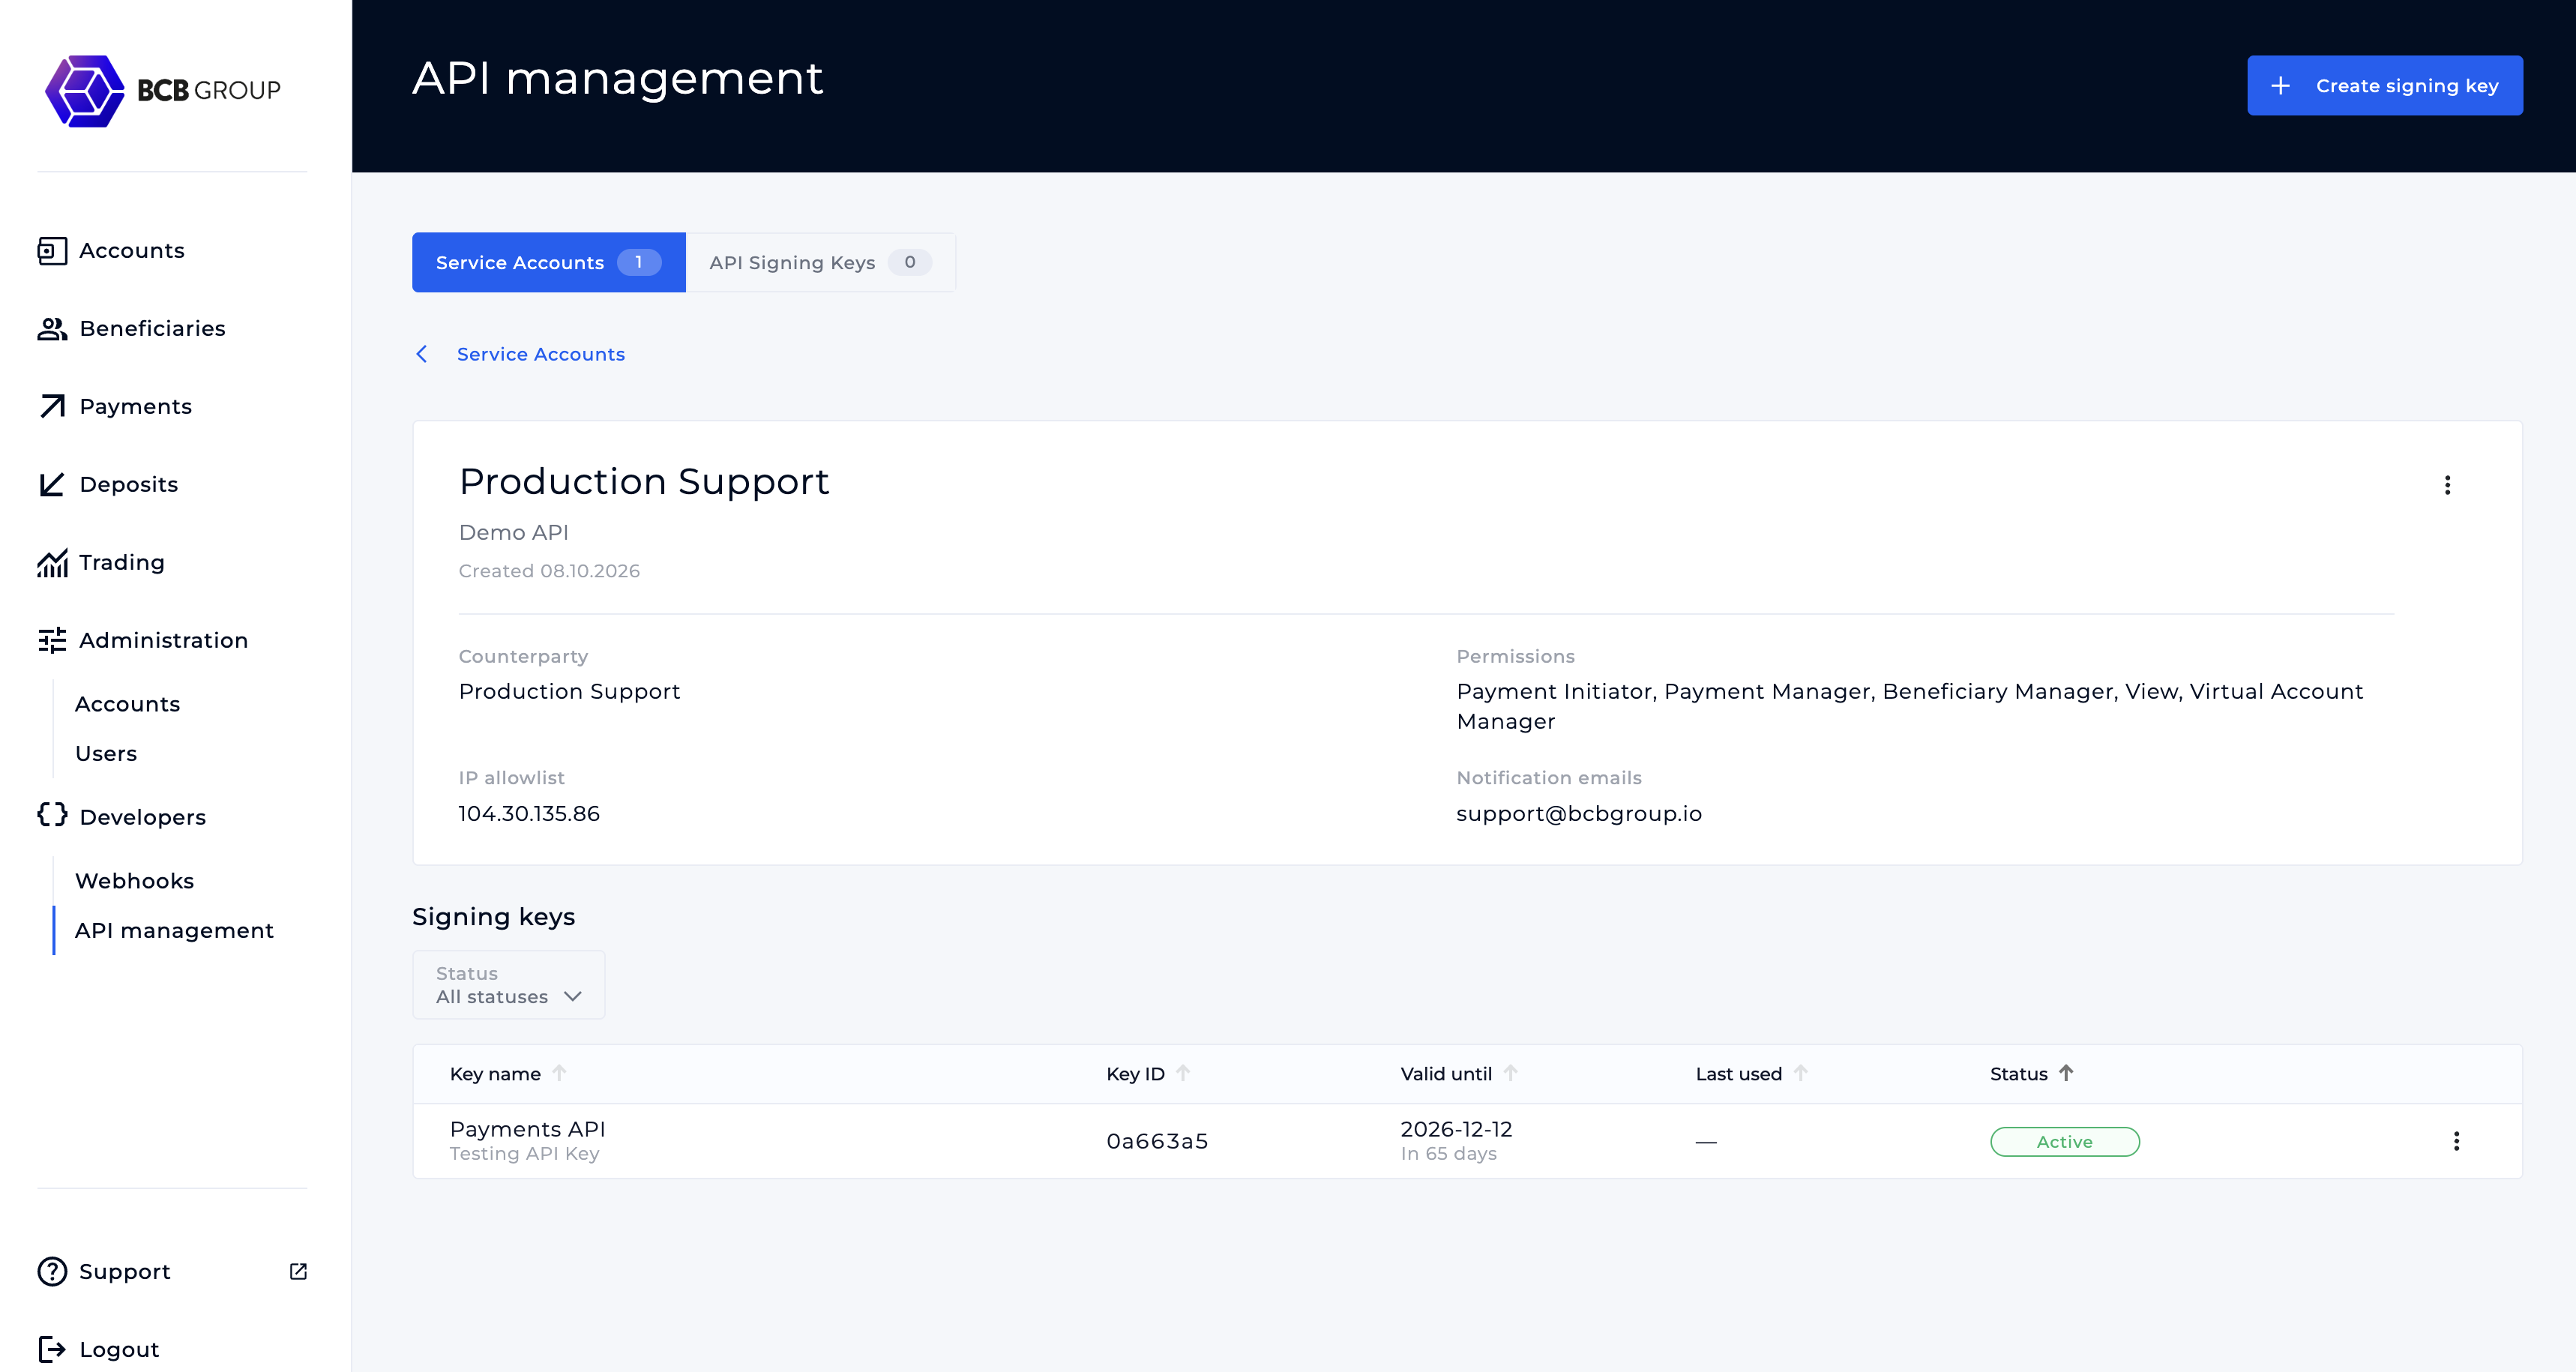
Rotating keys without downtimeA service account can have several active keys at once. To rotate, create a new key, move your integration to it, confirm requests succeed (check Last used), then revoke the old key.
Rename a signing key
- In the Signing keys table, click the ⋮ menu on the key's row and choose Edit.
- Change the Key name and/or Description.
- Click Update signing key.
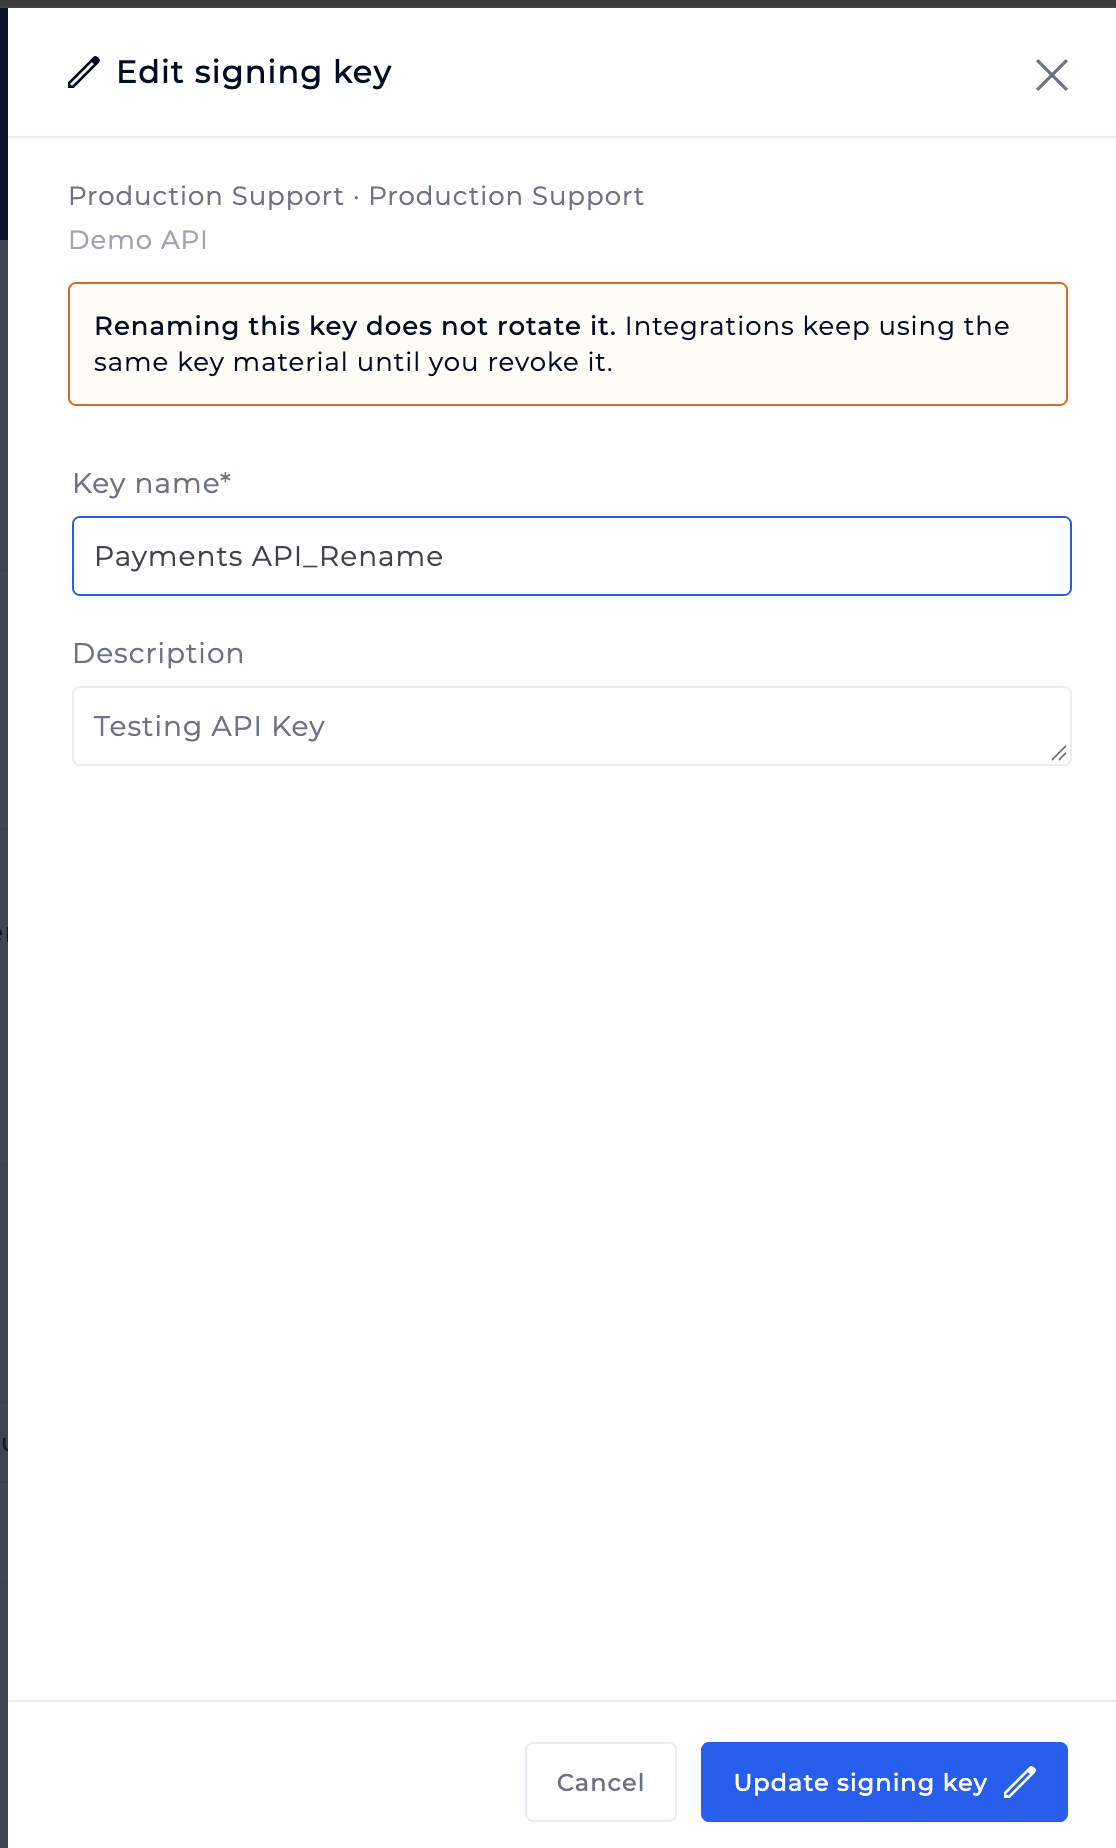
Renaming a key does not rotate it. Integrations keep using the same key material until you revoke it.
Revoke a signing key
Revoke a key when it's no longer needed, when you have rotated to a new key, or if you think the private key has been compromised.
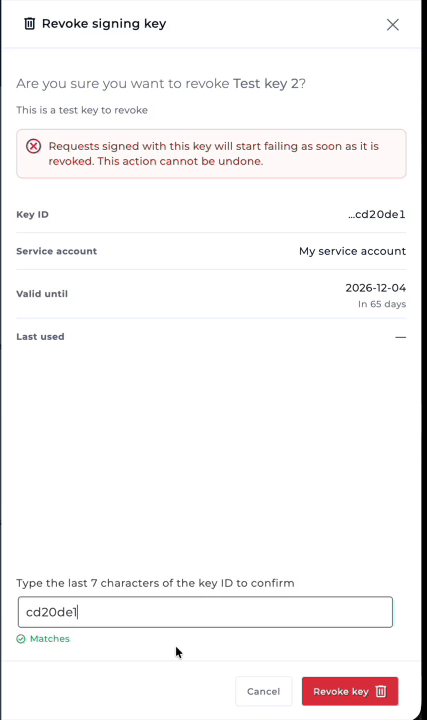
- In the Signing keys table, click the ⋮ menu on the key's row and choose Revoke.
- Check the key details shown (Key ID, service account, valid until, last used).
- To confirm, type the last 7 characters of the Key ID. A Matches indicator appears when they're correct.
- Click Revoke key.
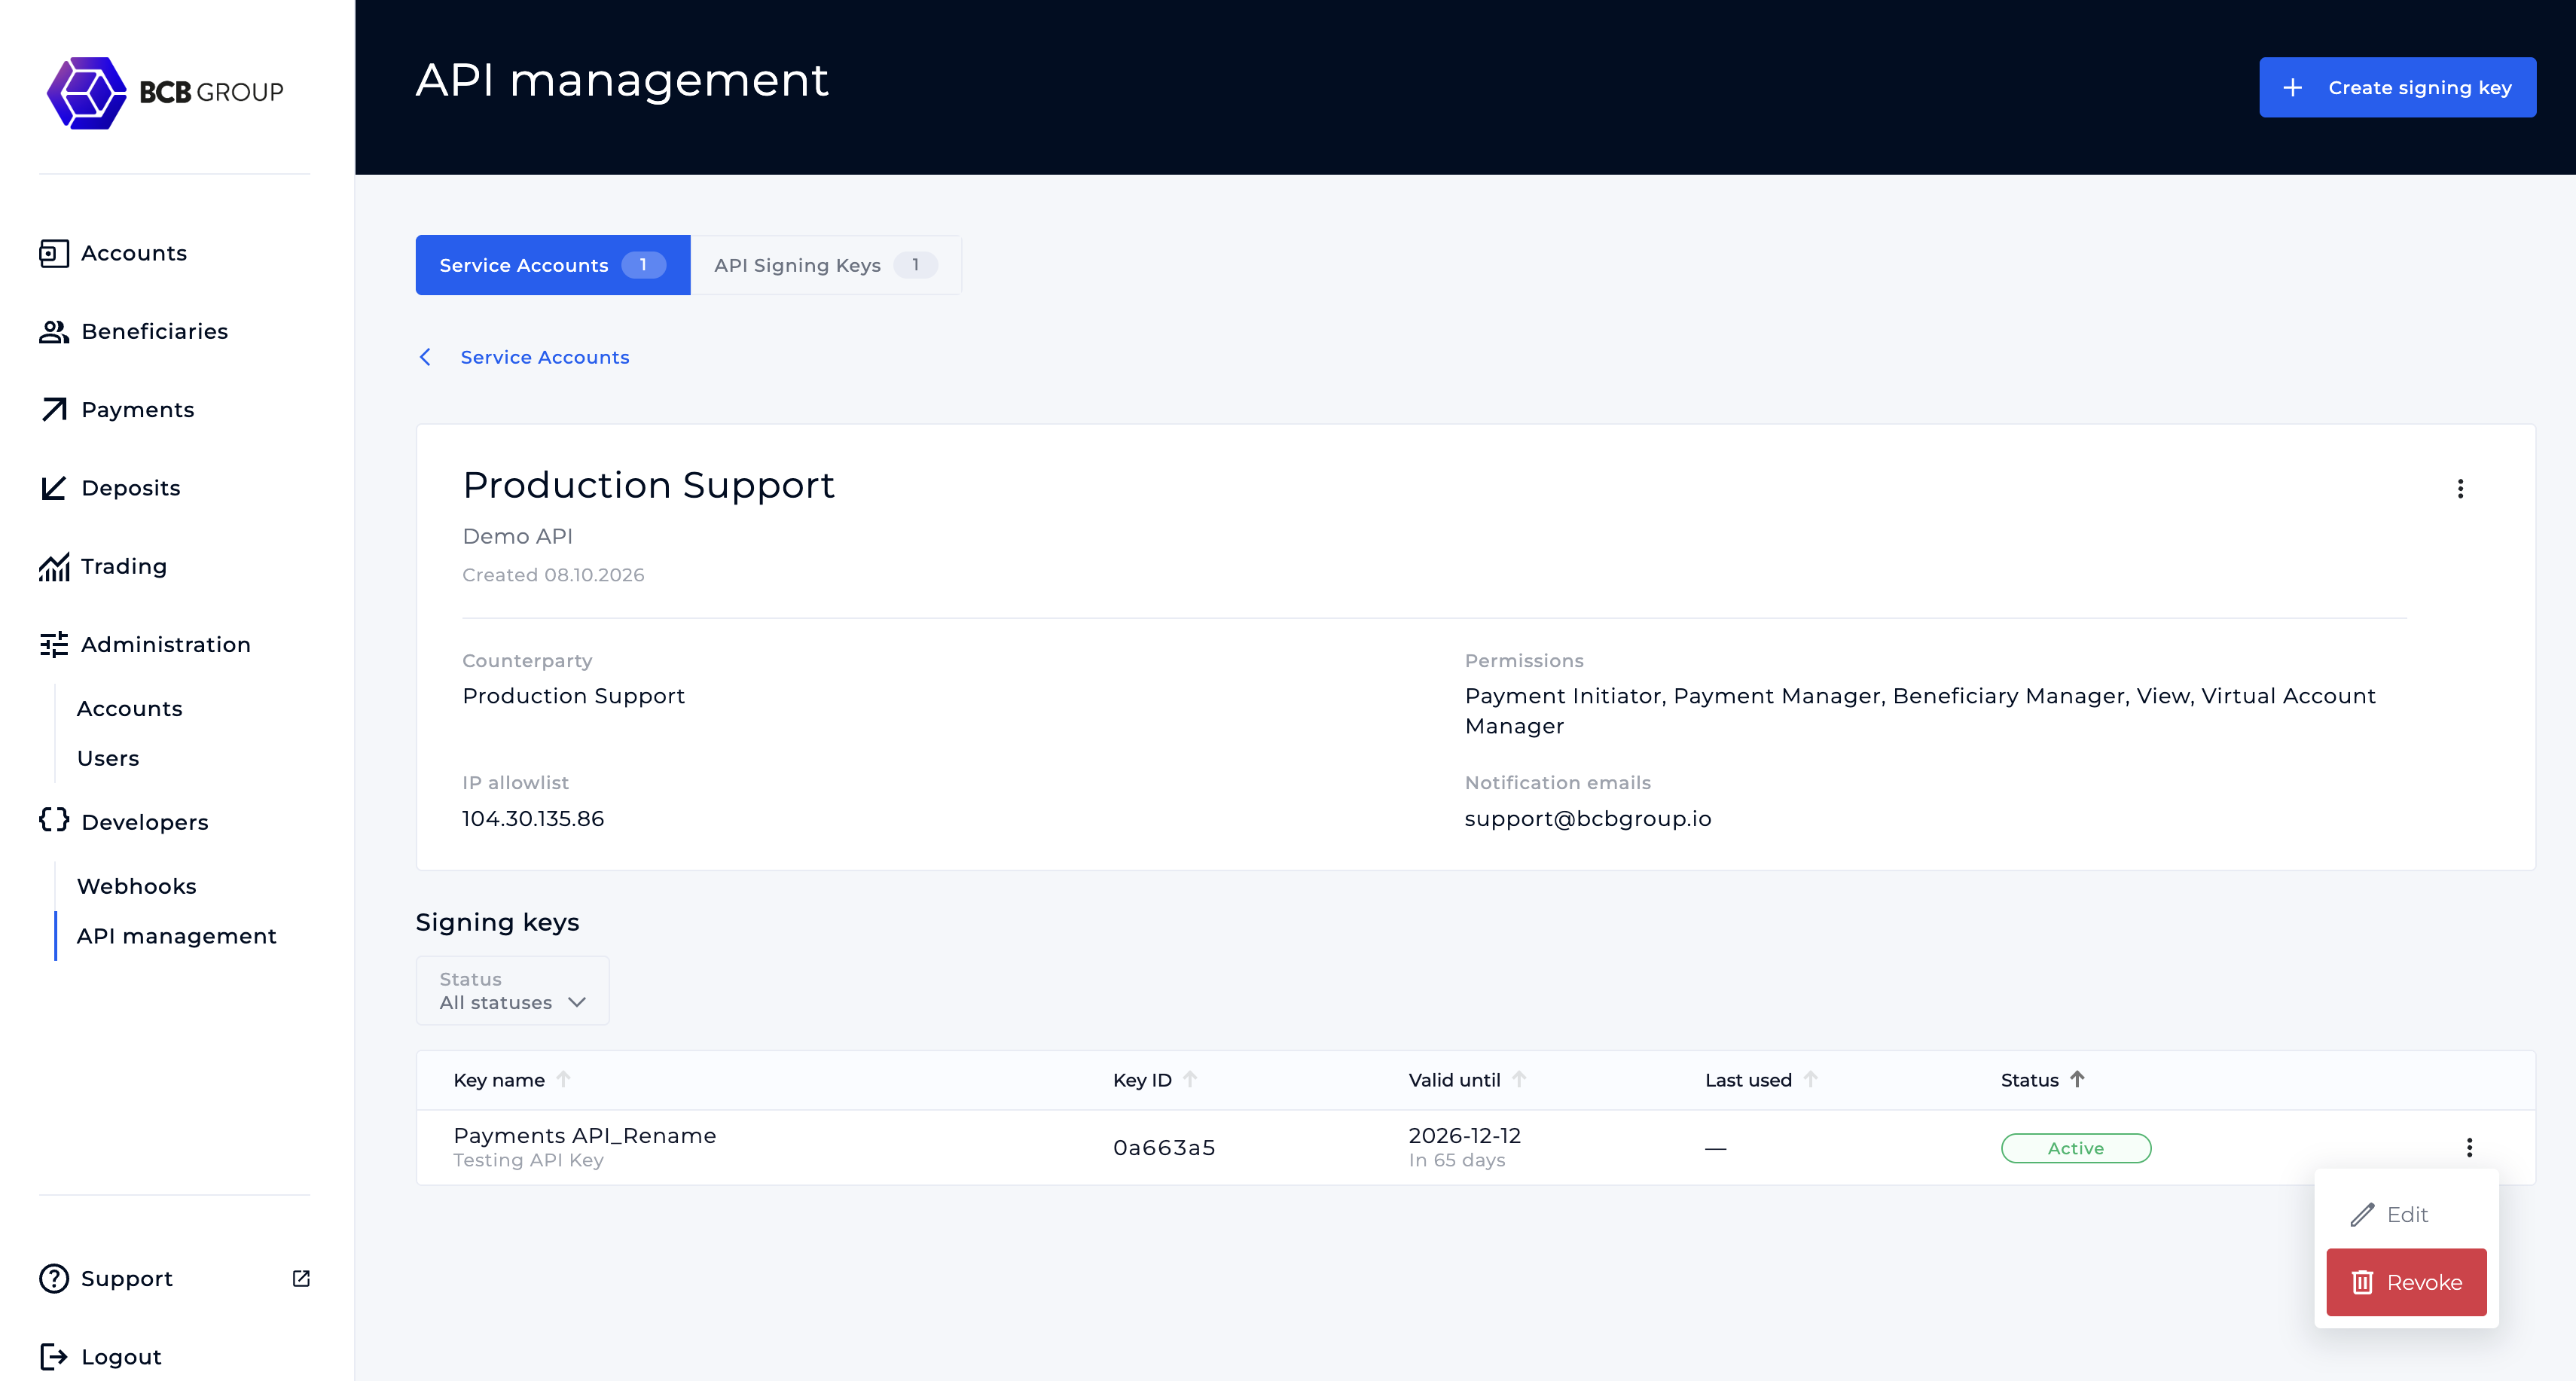
Revocation is immediate and permanentRequests signed with a revoked key start failing straight away. This can't be undone. You'll need to create a new key to restore access.
Delete a service account
You can only delete a service account once it has no active signing keys. If any key is still active, Delete is greyed out in the menu and a message tells you to revoke all active keys first.
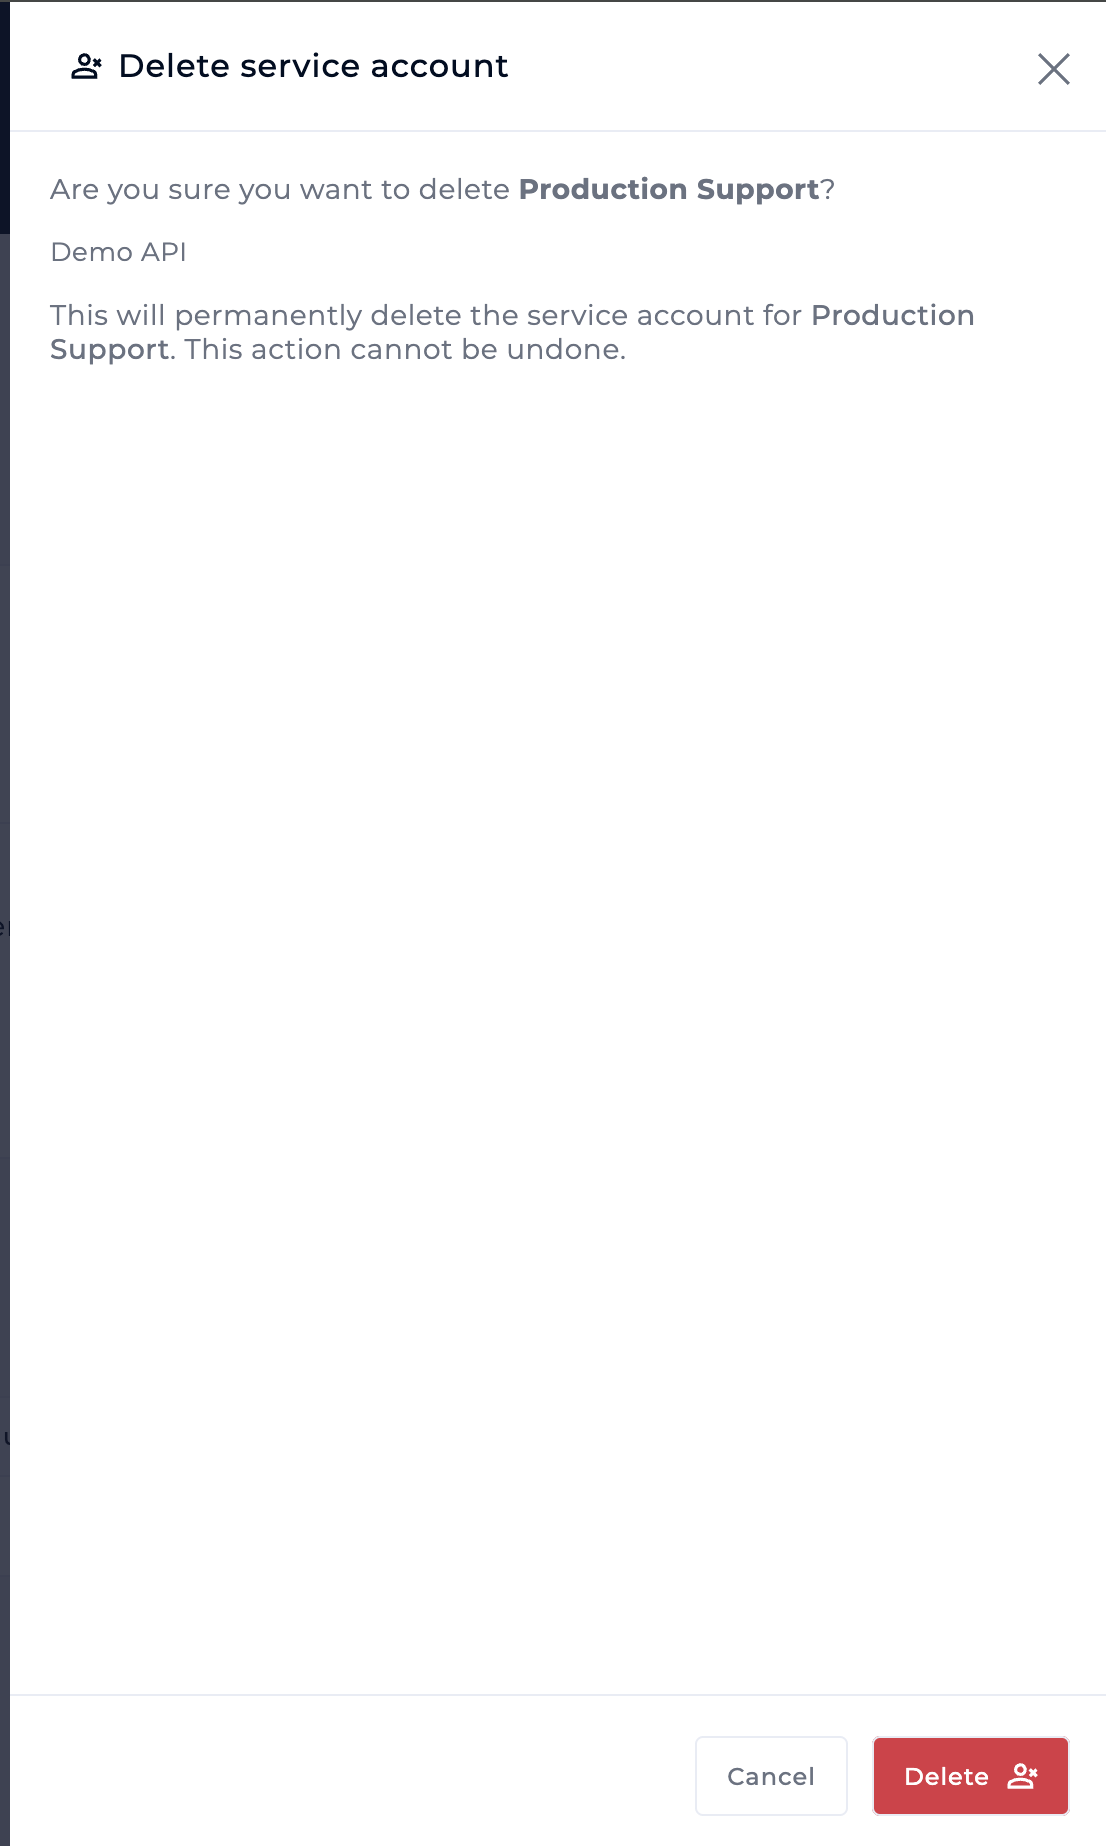
To delete a service account:
-
Revoke all of its active signing keys (see Revoke a signing key).
-
On the Service Accounts tab, click the ⋮ menu on the service account's row and choose Delete.
-
Check the confirmation, then click Delete.
Deleting a service account is permanent and can't be undone.
Monitor keys on the API Signing Keys tab
The API Signing Keys tab shows every signing key for your organisation in one place.
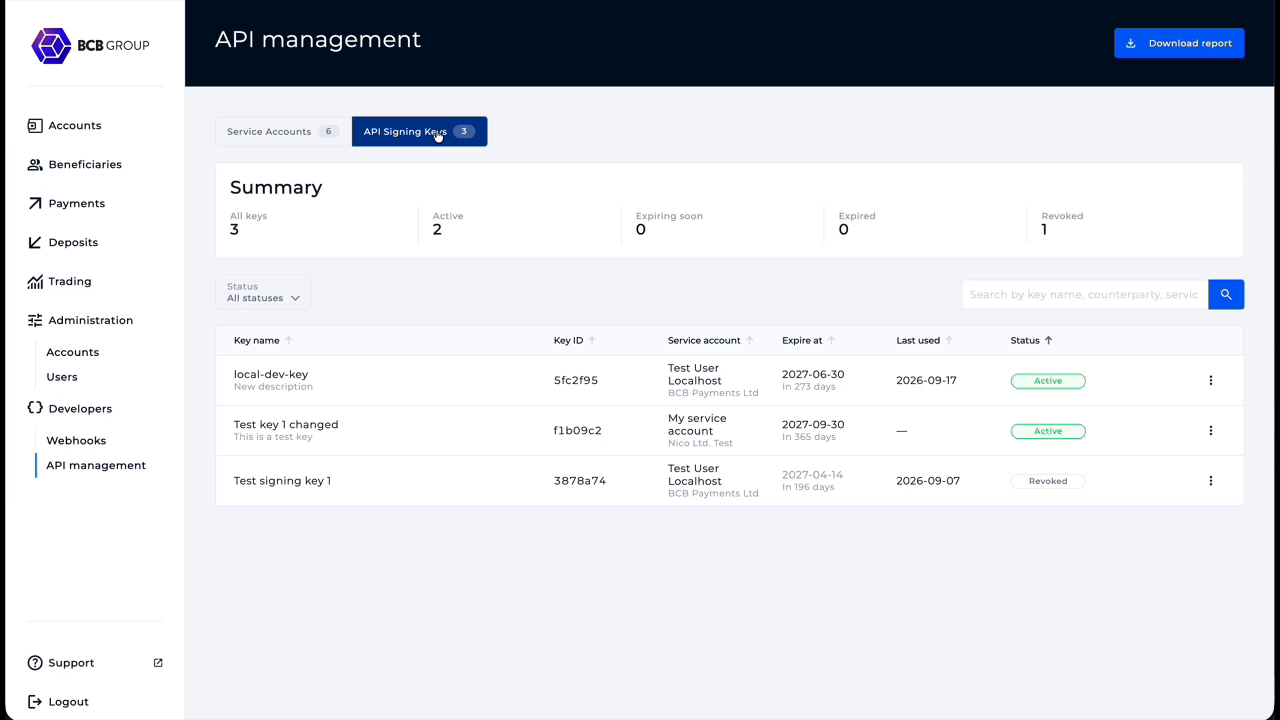
Summary: counts of All keys, Active, Expiring soon, Expired and Revoked.
Table columns: Key name, Key ID (last 7 characters), Service account (and its counterparty), Expire at, Last used, Status, and a ⋮ actions menu.
Key statuses
| Status | Meaning |
|---|---|
| Active | Valid and can be used to sign requests. |
| Expiring soon | Still valid but approaching its expiry date. Plan a rotation. |
| Expired | Past its expiry date and no longer accepted. |
| Revoked | Manually revoked and no longer accepted. |
Search and filter
-
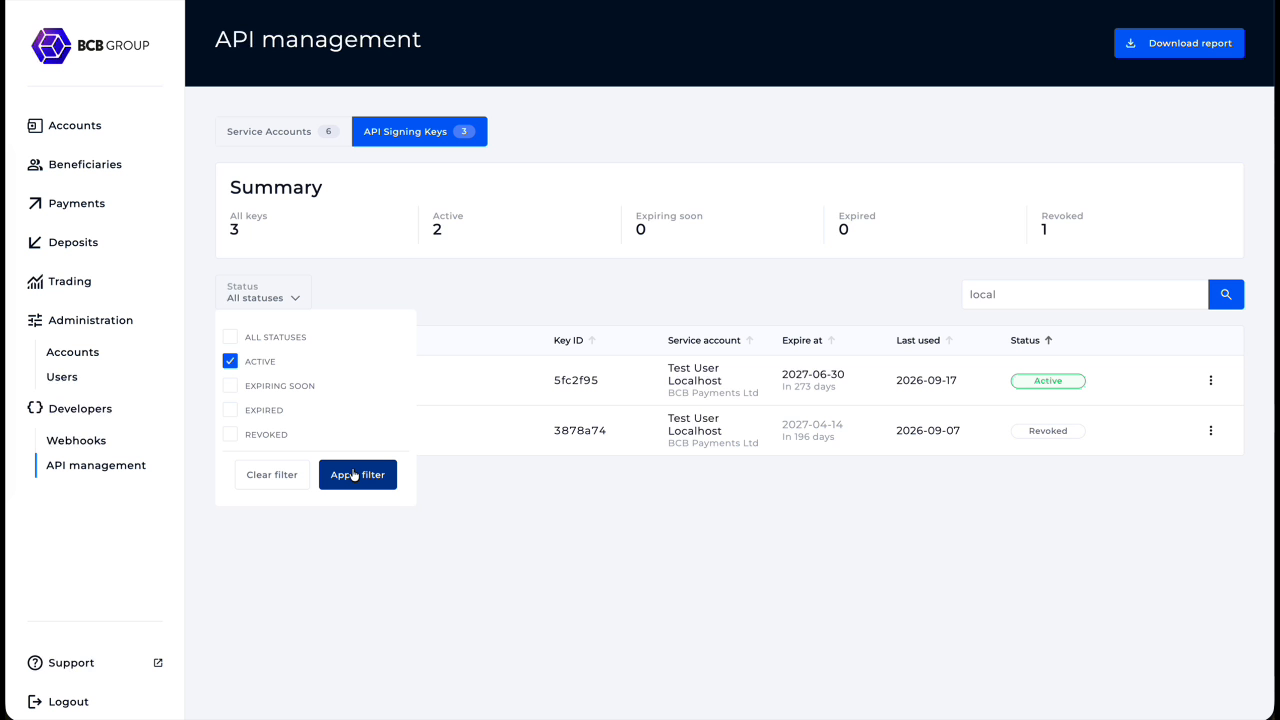
Use the search box to search by key name, counterparty or service account.
-
Click Status, tick one or more statuses, then click Apply filter. Click Clear filter to reset.
-
Click a column header to sort.
Download a signing-key report
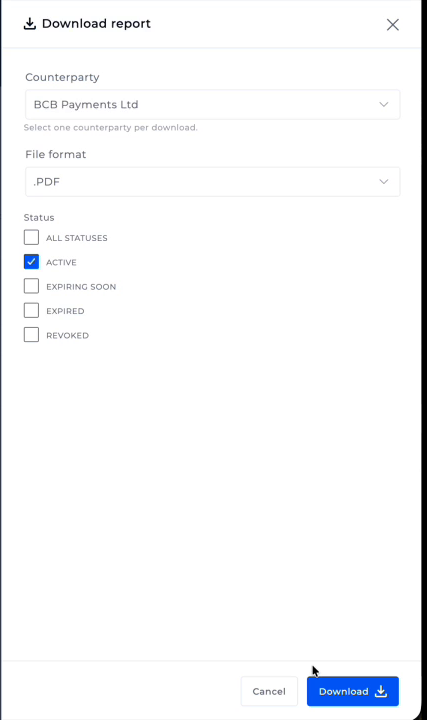
-
On the API Signing Keys tab, click Download report (top right).
-
Select the Counterparty. Each report covers one counterparty.
-
Choose the File format (e.g. .PDF).
-
Under Status, tick All statuses or the specific statuses you want.
-
Click Download.
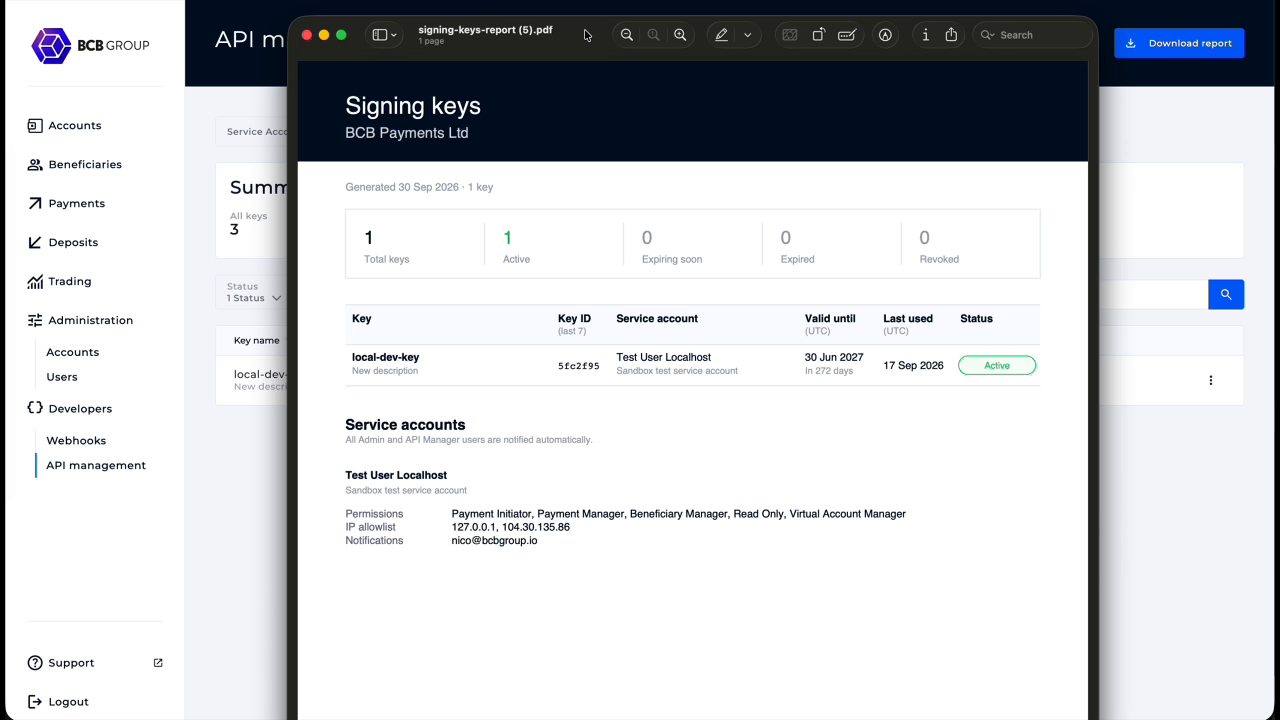
The report shows the generation date, a status summary, a table of keys (Key, Key ID, Service account, Valid until, Last used, Status) and the configuration of each service account included (permissions, IP allowlist and notification emails). It's useful for periodic access reviews and audits.
Troubleshooting
| Symptom | Likely cause / fix |
|---|---|
| "At least one notification email is required" | Type the email and press Enter so it appears as a tag. |
| Delete is greyed out for a service account | The account still has an active signing key. Revoke all active keys first. |
| Requests fail after editing a service account | Check that the calling IP is still on the IP allowlist and that the needed entity permissions are still switched on. |
| Requests fail with a key that used to work | Check the key's status on the API Signing Keys tab. It may be Expired or Revoked. |
| Lost the full Key ID | The full KID is only shown once, when the key is created. Create a new key, move your integration to it, and revoke the old one. |
| SMS code not received | Wait for the timer to finish and click Resend a new code. Check that your registered phone number is correct. |
Need help? Use Support in the bottom-left of the portal to contact the BCB team.
Updated about 1 month ago